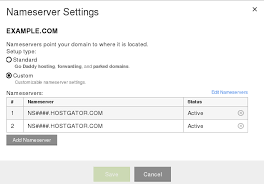
Well guys if you have a domain name and hosting account. Let us suppose you bought your domain name from GoDaddy and hosting service of BigRock, in order to put your domain name in to work you have to change the DNS record or Nameserver of your domain name or point your domain name to the nameserver of BigRock. In this post I will tell you how to change nameserver of domain name so that you will be able to install your website with that domain name. It’s very easy process you do not require any professional skills, all you have to do is:
(Note: Here I am giving you the example if you have a domain name xyz.com and you want to host your blog or website on BigRock)
Step1
While you setup your hosting account, use the domain name xyz.com when they ask you to choose the domain name you want to host. Now login to your bigrock account and click on the www.xyz.com.
How to change nameserver
Step2
When you click on www.xyz.com you will be redirected to the next page where you see the new option of nameserver details. Click on name server details.
How to change nameserver
Step3
Now you will see the details of your name server. Copy these details seperately.
How to change nameserver
Now half the game is over before going to the next part I would like to tell you that some hosting companies send their name server details at your registered email. You can directly get the details in your email account. :)
(NOTE : you have to change the DNS record only when your domain name provider and hosting service provider’s are different)
Step4
Now you have your name server details :) !!! oh! k guys just calm down next process is also very easy as the previous one. Login to your domain name provider’s account. Let us suppose you bought your domain name from GoDaddy login to your GoDaddy account. click on manage domains.
How to change nameserver
Step5
Now click on the manage button.
How to change nameserver
Step6
Now in Name server section click on manage.
How to change nameserver
Step7
Click on ADD NAMESERVER and add the details of the name server of BigRock or of one you are using and save the settings.
How to change nameserver
Yeah!! guys now everything is set.
As you have changed the name server it takes 24-48 hours for web propogation, but usually it takes few minutes. Once you complete the above steps you are ready to install your website now.

No comments:
Post a Comment